Sunday, 30 January 2011

It's been a long time since I've watched the 'Weekend Bakery' Actions... And almost every weekend among the proposed bakery goods I could find something for myself ... Some were very simple in implementation, others more complex and sophisticated ... But somehow I lacked the courage to actively take part in the action ... and since my adventure of baking bread began relatively recently, I did not feel too confident to stand in a competition with such a good bakers .... Well, but you only die once, I decided to join the Weekend Bakery and bake something as easy, fast, and what 'in my eye' can not go wrong! Well, I found it - in the 103 edition of Weekend Bakery, Mirosix of Cooking under the Pear Tree has proposed Italian loaf with herbs - I had to do it, if only because of my boundless love for Italy :) 


A few days ago after reading the recipe, I thought it was the easiest bread under the sun ... I need to bake it! In all my excitement, I got some culinary amnesia - because I completely mixed up the recipe ... Recipe recommended that after formed loaves, cut their surface and smear with blend of herbs and olive oil .... And when enthusiastically pouring all the ingredients into the bowl I also poured a mixture of herbs and olive oil into the dough ....Can you believe it? 
Mamma Mia - what have I done!!! And what do I do now, I thought, standing over a bowl of dough with added herbs .... you could see my face at this time:) hahahha ... but I thought that it would be disaster to throw away so many valuable goods. I sighed heavily, and after a moment of thought I decided to continue and see what comes up .... so I studied the recipe again, and following the recommendations of the author, I put the dough to rise and formed two pretty good-looking loaves, I put them in the oven and waited... 35 minutes baking seemed to be forever :) And what was my surprise when I took the loaves out of the oven? The looked absolutely beautifully. From the outside looked really great, with a crispy crust, nicely browned... But someone once said - 'do not judge a book by its cover' so when the tasting part came I got little stressed, but again, nice surprised - the bread came out great and herbs - olive mixture gave my loaves a real Italian flavor ... Well, I think everyone has their ups and downs in a kitchen, and my was pretty good so today I present to you mistakenly modified Italian loaf with herbs - a mix of olive... 


Italian bread with herbs 
Original recipe is here - click 

My mistaken recipe is below: 

Ingredients (for 2 loaves): 
1.5 teaspoons instant yeast 
3 cups hot water 
1 tablespoon salt 
2 cups bread flour 
4-5 cups flour (I added 1 / 2 cup wholemeal flour and 4 cups all purpose flour) 
1/3 cup olive oil 
½ teaspoon dried oregano 
½ teaspoon dried basil 
½ teaspoon dried parsley 
½ teaspoon salt 
1 clove garlic, crushed 


Dissolve yeast in water, let rest for 10 minutes. Mix 3 cups of flour with salt and dissolved yeast. Knead dough, gradually adding the remaining 2-3 cups of all other flour, herbs and olive oil. The dough should be fairly loose. On floured pastry board knead for about 5 minutes. Then put the dough in oiled bowl, cover with foil or a cloth and let rise for about 1 hour (dough should double the volume). 
Knead the dough again, divide into 2 balls and return to oiled bowl, cover with foil or a cloth and let rise for about 1 hour (dough should double the volume). Then form two oval loaves of bread, place them on parchment lined baking sheet, let stand for about 30 minutes. Bake bread in the oven at 210 degrees for approximately 35 minutes.


I wish you the same kitchen ups and persistence in baking bread!
Enjoy!

Saturday, 29 January 2011

Have you ever wondered what makes you love a specific country? Why have you visited this specific country on five consecutive years for the holidays? Why are you talking about this specific country with nostalgia? 


I still wonder what makes me and Jarek feel that way about Italy.... and why with every dish we love it more ...? We have an impression that there is something magical in Italian cuisine - firstly it catches you with its flavour and appearance and then seduces with the taste ... and that is all prepared a 'la minuta... :) 

Everyone knows that Italians love to cook and eat - it's the most important activity of daily living. I guess, it's just made by the ancient tradition of family gatherings that has survived to this day. During the feast, among the stormy debate about politics, sports or just a day, Italians  always exchange their comments on the consumed food. We fully support this tradition and practice in our house every day. Therefore, Italian food most often appear on our table - it's like a trip to sunny Italy ... 

Today, we prepared Roasted chillies frittata... In Italy, the frittata is a common way to use leftovers - usually made of pasta or vegetables from the previous day. Frittata is always fried, never baked in the oven as the other omlets, tortillles and tarts. Not for nothing it is called a frittata [Fritt-fried - comes from the verb fry - friggere]. Frittata is particularly popular in rural areas, and usually contains eggs, boiled or fried vegetables. Sometimes it also contains herbs or chopped chives, or fresh bread crumbs. In certain provisions, you can find meat or fish and cheese (fresh pecorino or formaggio fresco) or ricotta.


Roasted Chilli Frittata
inspired by Jamie Oliver
Ingredients:
4 chillies
1 green pepper
1 teaspoon red wine vinegar
'Extra Virgin' Olive Oil
handful of parsley
5 eggs
a handful of grated Parmesan cheese
2 cloves garlic
100g feta cheese (or goat's cheese)
salt and pepper to taste
rocket salad


Preheat your oven to full whack. Prick each of your chillies and pepper with a small sharp knife then blacken over a gas flame, in a dry griddle pan or under a grill. Once they’re nicely charred, pop them in a bowl and cover with clingfilm. After 10 minutes, remove the skin, stalks and seeds, then delicately tear lengthways into thin strips. Put these back in the bowl and marinate in red wine vinegar, a lug of olive oil and the parsley stalks. 

Heat olive oil and some butter in a small ovenproof frying pan, then add half of your marinated chillies and the garlic. Meanwhile, beat the eggs in a bowl with some grated parmesan and a good pinch of salt and pepper. Put a few of your parsley leaves to one side, then finely chop the rest and add them to the eggs. 

Pour the eggs into the pan then crumble in half of the goat’s cheese. Move the pan around a bit to spread everything around. When the egg is just starting to set, crumble most of the remaining goat’s cheese over, then pop the frittata in a hot oven for 5 minutes or until it doubles in size. Some people cook their frittatas all the way through, but I prefer mine only just done. Once it’s out of the oven, delicately drape the rest of your marinated chilli strips over the top, crumble over the last few bits of goat’s cheese, then drizzle over a little of the chilli marinade. Sprinkle with the reserved parsley and serve with something fresh and lovely, like a rocket, lemon and parmesan salad.


Enjoy!!!

Monday, 24 January 2011

It seems that after a few joyful, sunny days, lower temperature attacked again ;( it's raining again... I've got a thousand excuses not to leave the house... Everyone has probably some ways to cope with their winter blues... All we desire, is to curl up comfortably and keep munching filling and hearty goodies that warm our body and soul. 
In these cloudy, rainy days, when the markets stalls offer frozen, ugly-looking vegetables, we took advantage of the benefits of nature which are quietly hiding in the corners of kitchen cabinets and waiting for days like today... 
We're talking here about all sorts of beans, peas, lentils. They are great source of protein, starch and vitamins. They don't only boost our immunity, but also not lose their beneficial nutrients during all kinds of cooking, baking, stewing. That is why we love to eat them in any form ...especially in the form of soup... 
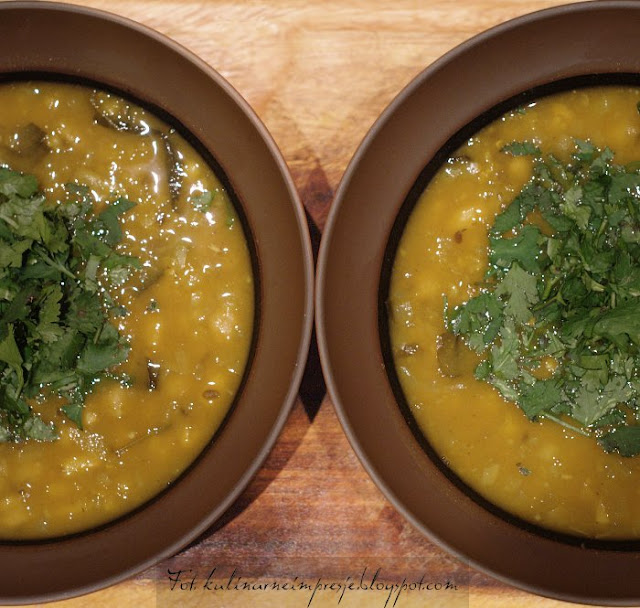
These are one of the most popular winter comfort foods because you can have them hot and spicy and enjoy them the most. The hotter the soups are, the better they will be for such a cold day like this.... There is probably as many bean soups as housewives in the world ... we like the winter bean soup which is spicy, very aromatic and heart warming ...:) And that's what we cooked today... soup... Maroccan spicy bean soup with mint.


Maroccan spicy bean soup with mint.
Inspired by the Australian Women's Weekly Cookbooks, 'Middle Eastern'. 

Ingredients:
2 tbsp olive oil 'Extra Virgin'
1 medium onion, finely chopped
2 cloves garlic, crushed
1/2 teaspoon ground cinnamon
1tsp sweet paprika
1tsp coriander powder
1tsp cumin seeds
2 cans of chickpeas in a brine
1 can red kidney beans
100g red lentils
1.25 l vegetable stock
60ml lemon juice
1/2 cup chopped fresh mint


Heat oil in a pan, add onion, garlic and spices, cook, stirring, until onion is soft.
Stir in peas, beans, lentils, stock lemon juice and mint, covered, about 20 minutes, stirring occasionally, or until lentils are tender. Serve with pita bread or on its own. 

Enjoy!!!


Monday, 17 January 2011

Today, 17 January, and our favourite International Day of Italian Cuisine!


Why January 17th?
January 17 is a date of great symbolic importance. It’s the day of the catholic feast of Sant’Antonio Abate, one of the most popular saints of Italy, the patron of domestic animals, but also of butchers and salami makers. On this day, according to tradition, the Italian Carnival begins, that period of the year during which, since unmemorable time, it’s “licet insanire,” transgressions are tolerated and good, rich food is celebrated and, along with this: cooking.

That is one of our favorite days of the year because we celebrate with others traditional products and dishes straight from the sunny Italy but we have already written about it before. That is why today will be short and concise and to the point... Pesto alla Genovese... Already known in ancient times, passed through various transformations. But more beautifully described history of pesto can be found here.


We have done our pesto according to the traditional recipe:

Essential equipment
1 marble mortar
1 wooden pestle

Ingredients
100 gm of fresh Genovese basil. 
30 gm pine nuts 
60 g aged Parmigiano Reggiano or Grana Padano cheese freshly grated, do not compromise on this ingredient and make sure is good quality
2 garlic cloves 
10 g flaky salt
80 cc Extra Virgin Olive Oil from 


Wash the basil leaves in cold water and dry them on a paper towel but don’t rub them.
In a mortar finely crush the basil leaves the garlic clove and pine nuts ,add the salt and cheese to he mixture and keep pounding using a light circular movement of the pestle, add some of the Extra Virgin Olive from time to time and keep pounding and mixing until you obtain a very fine and smooth creamy sauce, pesto should not be greasy and the amount of oil used must be well absorbed and not floating on top
The preparation must be done as quickly as possible to avoid oxidation problems.

NOTE: The reason why, you should not use a blender, is because rather than having its juices released by crushing action of the wooden pestle, the metal blade of the blender will chop the leaves and this action will compromise the flavour.


What we enjoyed most, that although we do not live in Italy, we were able to buy a Basil Genovese here - hurraa ... :) It was worse with garlic, but the one we used is as gentle as that recommended in the traditional recipe. According to the tradition, we used a mortar and peslte. It's amazing how quickly the kitchen space was filled with aroma of crushed basil with other ingrredients ...ahhh ...

But the pesto itself is not all! It is primarily a great addition to the pasta and other dishes... That is why we made a pasta alla Daria today ... :) The recipe simply came to my mind (although I think someone had already done it). Staying in at the atmosphere of green colour, which dominates in pesto, I decided to use the same green additions to our dish... The second reason was of course the contents of our fridge. Because food is never wasted in our house, then obviously we used the remaining vegetables with pesto in the lead role.


Tagliatelle with greens and pesto

Ingredients for 2 large servings:
Pasta Taglliatelle
3 tablespoons pesto homemade of course :)
fresh baby spinach
green peas (frozen)
green beans (frozen)
pinch of nutmeg
salt and pepper (to taste)
Extra Virgin Olive Oil
10g freshly grated Parmigano Reggiano

Cook pasta 'al dente' with good spoon of olive oil. In the meantime, warm up a frying pan and add a little bit of olive oil, together with rinsed fresh spinach showered with pinch of freshly grated nutmeg. This will help to release spinach's aroma. After 2 minutes add the beans, and the peas and cook for about 3-4 minutes, stirring frequently. When the pasta is ready, drain it in a colander. Now sprinkle pasta with a little bit of olive oil to taste. Then add the pasta to the vegetables and throw in 3 tablespoons of the pesto. Mix all ingredients thoroughly but gently so that all is well combined with pesto - about 3 - 5 minutes. Serve on a plates and decorate with a pinch of freshly grated Parmigiano Reggiano cheese.

It's done! We consumed it with our favorite Pinot Grigio .... Deliciozo .... :)

Enjoy!

Saturday, 15 January 2011

It was rainy day... I had to fight with myself to get up in the morning... Staying in bed seemed to be the best option after the whole busy week. I've decided to do only pleasant things, not to worry about anything and just chill out... 

It was nearly afternoon when  I was just getting ready to go out for a walk and suddenly storm came... Well, in that case I'm not going anywhere, I thought!!! I generally like when it's raining... I enjoy the smell of rain and even run through the puddles... like when I was a kid... 

But today is definitely one those days that I don't want to get wet, I don't want to put my wellies on and not even smell it, let's face it... I'd rather stay indoors, look at rain through my bedroom window, read a book, have a huge cup of hot tea with lemon and hug my fluffy blanket... And that's what I did... Lazy day someone would say but not exactly... I've done some work too... :) I baked.... French dimpled rolls! The easiest recipe I've ever seen - it requires less time and it's ready in 2 - 3 hours... Just perfect for one of those days.... :)


FRENCH DIMPLED ROLLS
based on the recipe from 'Moje wypieki'.

Ingredients for 10 rolls:
400g bread flour
11/2 tsp sugar
1 tsp sugar
15g dried yeasts
120ml warm milk
170ml cool water


Mix the flour with salt in a large bowl, add sugar, make a hollow in the middle. Dissolve yeast in milk, pour into the hole, lightly sprinkle the top with flour and leave at room temperature for 15 - 20 minutes. Then add water, mix, giving a moist, soft dough. Knead on lightly floured wooden board for 8 - 10 minutes until it becomes smooth and elastic. Put the dough into to a bowl, cover with cloths and leave to double in a warm place (about 1.5 hours).

Put the dough on a wooden board, knead lightly and let stand for 5 minutes to "rest". Divide into 10 parts, with each of them to form a ball in your hands, then lightly roll to give an oval shape. The top lightly sprinkle with flour. Cover with cloths and let rise for 30 minutes (rolls should expand in size). After this time, make a dimple in each ball. I did it with the end of a wooden spoon. Again, leave them to rise for 15 minutes. 

Preheat oven to 230ºC, place the container on the bottom of the oven. Insert the risen buns and bake about 13 - 15 minutes until golden brown.


How do you normally spend your rainy days?


Wednesday, 12 January 2011

So, we are in the second stage of the competition for the Blog of the Year 2010 in the category of "My interests and passions". In this stage, the fate of Kulinarne Impresje and all the other blogs participating in the competition depends on the number of SMS sent by our fans and readers at the following number... If you want to vote for our blog, we will be very pleased ... And this can also serve as the entire income from texts will be used for charitable purposes and will be transferred to cover the cost of rehabilitation for people with neurological disabilities... I think, this is a great reason to vote!!! We will vote for our favorite blogs too!!!!


If you want to vote for Kulinarne Impresje, simply send a TEXT of H00522 to 7122 number.
You can vote up to 20 January 2010 at 12:00.
The cost of SMS is 1.23 PLN.

Thank you!
Daria & Jarek

Sunday, 9 January 2011

Together with Jarek, we are not a special fans of sweets... We've never been, even as children. Maybe that's why I haven't learnt how to bake cakes. In our house rarely host sweets, candies and cookies, only if someone give it to us as gift. We're quite happy to swap a candy for a delicious sandwich with a favourite cheese and tomato ...
Although I have to admit that sometimes it happens to us that we suffer from peculiar craving for chocolate, and then we take a quick walk to a nearby store, where the chocolate is eaten at lightning speed - sometimes even before we pay for it so with a big smile on a face we show the cashier an empty chocolate box : )
Usually, when we visit our friends, on the table next to tea and coffee always appear some biscuits, chocolates or other sweets. In turn, with other friends who have children, we always wonder why the kids scour the kitchen cabinets so intensively - they definitely know what their mums are hiding there :)


Recently while sorting out my culinary magazines and random pieces of paper with recipes from my friends, I found this great recipe for muffins. But these are unusual muffins, because they are not sweet but slightly spicy and savoury... Absolutely great idea for us, I thought....


Ham, cheese and chive muffins
'Feel Good Food' Magazine

Ingredients for 6 muffins:
225g plain white flour
1tbsp baking powder
1tbsp chicken stock granules
1/4tsp cracked black pepper
75g Gruyere or Emmental cheese, cut into cubes
small handful fresh chives, finely chopped
2 large eggs
150ml milk
50ml 'Extra Virgin' olive oil
75g smoked ham, chopped into tiny cubes

Moreover: 6-hole muffin tray, oiled or 6 double-thickness paper cases 


Mix all the dry ingredients in a bowl, reserving a little of the cheese and chives, then cover and chill in the fridge. In a separate bowl, whisk together the eggs, milk, oil and 1 tablespoon of cold water, then cover and place in the fridge to chill.

An hour before serving, heat the oven to 200 degrees, 180 degrees with fan. Stir the wet ingredients, including ham, into the dry ingredients to form a moist, lumpy batter, ensuring that there is no pockets of unmixed flour. Spoon the mixture into the muffin tray, scattering with the reserved cheese and chives. Bake for 30 minutes or until the muffins are browned, crusty and fragrant. Serve warm with extra butter for spreading, if liked.


We liked it, would you?


Every fan of Italian food only wait for the next, 4th edition of International Day of Italian Cuisine. As usually, this will take place on the 17th January 2011. This is a worldwide celebration of truly authentic Italian cuisine. 

International Day of Italian Cuisines


Last year, we had a pleasure to celebrate this day in Kulinarne Impresje and we learned how to prepare a quality authentic Tagliatelle al Ragu Bolognese. This year's official dish is Pesto alla Genovese, originated in Genovese, in Region of Liguria. Pesto is one of the most popular uncooked sauces, reproduced with many variations, depending on the country. 
Together with Chefs from more than 40 countries we will be taking part in creating authentic Pesto alla Genovese shared by GVCI on this special day but any italian food lover can join us in this celebration. 

GVCI - Virtual Group of Italian Chefs is a network of over 900 professional, italian chefs, working in 70 countries. They all work together to preserve and improve the standard of quality and authenticity of italian gastronomy and products in the world. You can read more about the GVCI here

So, we invite you to join us on January 17th by making The Authentic Recipe For Pesto alla Genovese from GVCI. 

Some of you might have a difficulties in finding specific ingredients, depending on a country. But we're sure that this lovely Pesto alla Genovese can be easily made at home by using fresh home basil, pine nuts, Parmigiano Reggiano, fresh garlic, sea salt good quality 'Extra Virgin' olive oil. The only tools you need are marble mortar (or any mortar you have in your kitchen) and wooden pestle. 

See you on 17th January!!!!


Thursday, 6 January 2011


I have to confess that baking, cooking and all these kitchen stuff is a great stress-relieving therapy. Well, maybe it sounds a bit odd but I'm really relaxing in our kitchen. It's a pity that our kitchen is so small - I wish I had all those fancy kitchen utensils and gadgets, but I'm afraid there is not enough space there to keep it all, at least not just yet. So, this is our big wish for the next decade: 'We want to have a huge kitchen with a big table for the whole family and friends...'.
Anyway, I was talking about relaxing in the kitchen... That's right, I do relax while cooking, chopping, stirring etc... It's just a great opportunity to think and switch off the brain and just contemplate the smells...even if you chop an onions :) hehehehe That's why we love being in our kitchen...

I've been doing lots of night baking lately. Is that insomnia? I don't know ;) but who cares!!! It is something magical in baking while everyone's asleep... especially bread. Ahhh... the smell of bread right out of the oven - is there anything like it? 

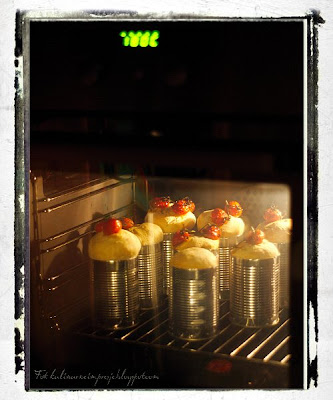
Some time ago, I found this gorgeous looking bread in a tins recipe on one of my favourite blogs. Originally, the recipe is from Jamie's Oliver book 'Jamie's Kitchen'. It took me a while to bake it as I had to collect tins first. But I made it eventually and it was just a right moment... peaceful night, warmth of the house, light of the candles.... 


Bread baked in a tins (with cherry tomatoes and garlic)


Ingredients (6-8 little loaves in a tins):
Bread dough:
1 kg wheat flour
625 mls cool water
30 g fresh yeasts or 3 sachets (7 g each) of dried yeasts
2 tablespoons sugar
2 tablespoons sea salt

Moreover:
1 kg cherry tomatoes
1 whole garlic
1 bunch of fresh basil
sea salt
freshly ground black pepper
1-2 dried chillies
good quality olive oil
6-8 tall cans of tomatoes, cleaned and dried.


Put the machine on the dough cycle and let it do its thing with all the bread dough ingredients. Since, I got this multifunctional food processor for my birthday, I let the machine do the job for me. If you don't have a machine, just pile the flour on to a clean surface and make a large well in the centre. Pour half your water into the well, then add your yeast, sugar and salt and stir with a fork.

Slowly, but confidently, bring in the flour from the inside of the well. (You don't want to break the walls of the well, or the water will go everywhere.) Continue to bring the flour in to the centre until you get a stodgy, porridgey consistency – then add the remaining water. Continue to mix until it's stodgy again, then you can be more aggressive, bringing in all the flour, making the mix less sticky. Flour your hands and pat and push the dough together with all the remaining flour. (Certain flours need a little more or less water, so feel free to adjust.)
With a bit of grease, simply push, fold, slap and roll the dough around, over and over, for 4 or 5 minutes until you have a silky and elastic dough.  In the meantime, preheat the oven to 150 degrees and put tomatoes, whole garlic basil, salt and pepper, chillies into a baking pan and shove it into the oven for about an hour. When all ingredients are baked, peel the skin off the tomatoes and garlic. Use a blender to mix all the baked ingredients and add the mixture to the bread dough and knead until nice and smooth. 

Flour the top of your dough. Put it in a bowl, cover with clingfilm, and allow it to prove for about half an hour until doubled in size – ideally in a warm, moist, draught-free place. This will improve the flavour and texture of your dough.

In the meantime, dig out those saved tomato juice cans. Give the cans a good spritz with olive oil and when the dough is ready, divide it into equal parts and pop them into the cans. Spritz the tops of the dough, cover the cans, let rise for about 1/2 an hour. 

When the dough is ready, put all the cans into preheated oven to 180 degrees and bake for about 20 minutes until golden brown. If you want to make the bread in a regular bread pan, this recipe makes one standard loaf and you have to bake it for 30-45 minutes.  Once baked, place on a rack and allow it to cool for at least 30 minutes.


They came out perfectly! Enjoy!!!!


Related Posts Plugin for WordPress, Blogger...